|
Please note: if you are one of those on my Yahoo Groups email update, I'm sorry to inform you that I will no longer be sending emails. Yahoo Groups has a glitch that has me locked out and, after hours of an endless loop of frustration, I've given up trying to get back in. Sorry for the inconvenience.
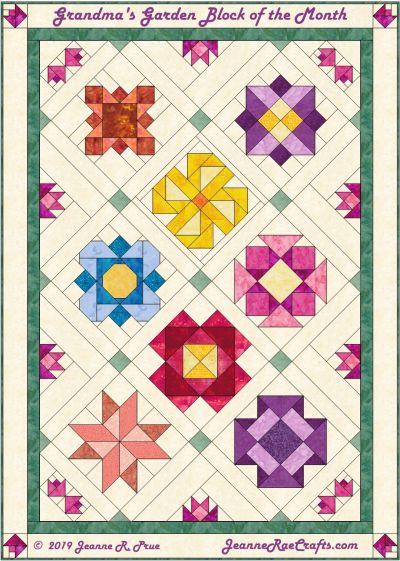
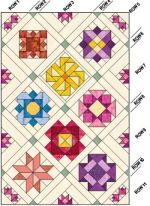
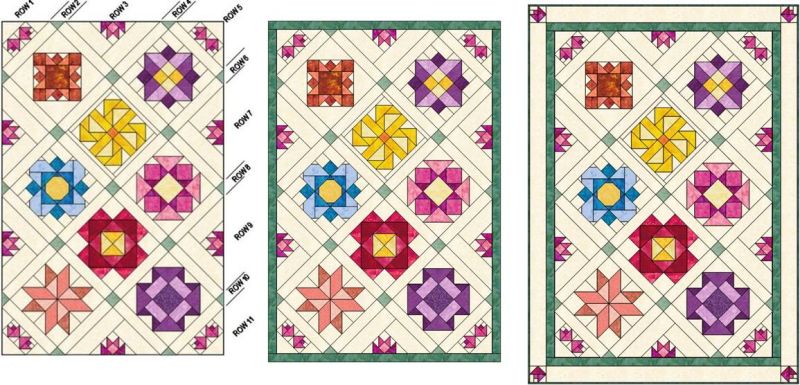
The Grandma's Garden Quilt is Jeanne Rae Crafts' Block of the Month project for 2019. My Grandma had a sweet little flower garden on their farm. As a child, I didn't know which flowers were which but it still enchanted me nonetheless. My favorite was her huge clematis vine next to the door. This quilt design is in her honor.
We've featured a BOM project every year since 1998, making this project our 22nd! Come back monthly for each succeeding step. The Grandma's Garden Quilt features pieced and foundation paper pieced blocks.
The eleven steps to making the blocks will be introduced throughout the year with the finishing directions also included. The last month will be a bit of a surprise to end the year. This quilt can be made with coordinating fabrics, or each block could have its own color scheme using scraps or fat quarters. Whichever you choose, it will warm your heart as a lap quilt or wall hanging.
|
Fabrics needed:
- Background - 3¼ yd.
- Fat quarters in a variety of colors or various scraps
- Border 1 - ¾ yd.
- Border 2 - ⅞ yd.
- Binding - ½ yd.
- Backing - 4 yd.
- Batting - 55” x 75”
|
Grandma's Garden Quilt Blocks

1. Clematis
2. Hollyhock
3. Evening primrose
4. Blue Flax
5. Lily
6. Aster
Grandma's Garden Quilt Blocks
7. Peony
8. Catchfly
9. Rose
10. Rosebud
11. Finishing
|
|
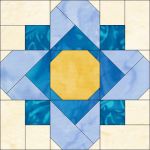
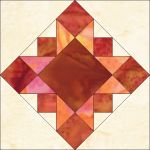
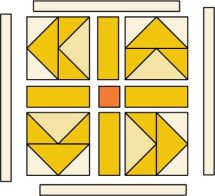
Block 1 - 12" Clematis (12½” unfinished)
Cut:
- 2 background - 4 7/8” x 4 7/8”; cut in half diagonally to make 4 triangles.
- 4 background - 2½” x 4½”
- 8 dark - 2½” x 2½”; mark a diagonal line on the wrong side.
- 1 medium - 4½”x 4½”
- 2 medium light - 4 7/8” x 4 7/8”; cut in half diagonally to make 4 triangles.
- 4 light - 2½” x 4½”
Directions:
- Flying Geese - On the wrong side of all the small squares mark a diagonal line. Place a square right sides together with a background rectangle; stitch on the marked line. Trim seam to ¼” and press. Repeat for the remaining square. Make 4 flying geese units.

- Stitch each flying geese unit to the light rectangles.
- Stitch together the remaining background and dark triangles to make 4 squares for the corners.
- To finish, stitch units into rows. Stitch rows together.
|
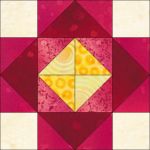
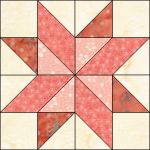
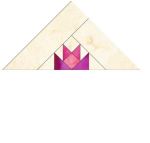
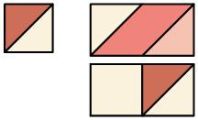
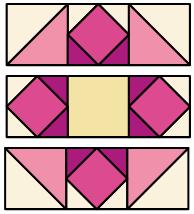
Block 2 - 12" Hollyhock (12½” unfinished)
Cut:
- 4 background - 3½” x 3½”
- 4 dark red - 3½” x 6½”
- 8 medium red - 3½” x 3½”; mark a diagonal line on the wrong side.
- 2 light red - 3 7/8” x 3 7/8”, cut in half diagonally to make 4 triangles.
- 1 light yellow - 3 7/8” x 3 7/8”, cut in half diagonally to make 2 triangles.
- 1 dark yellow - 3 7/8” x 3 7/8”, cut in half diagonally to make 2 triangles.
Directions:
- Flying Geese - On the wrong side of all the medium red squares mark a diagonal line. Place a square right sides together with a background rectangle; stitch on the marked line. Trim seam to ¼” and press. Repeat for the remaining corner. Make 4 flying geese units.

- Stitch the light and dark yellow triangles to the light red triangles. Stitch those units together like a 4 patch to make the center of the block.
- To finish, stitch units into rows. Stitch rows together.
|
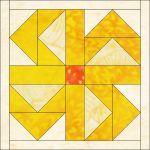
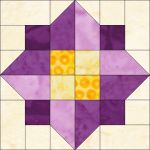
Block 3 - 12” Evening Primrose (12½” unfinished)
Cut:
- 4 background - 2¾” x 2¾” ; mark a diagonal line on the wrong side.
- 2 background - 1¼” x 11”
- 2 background - 1¼” x 12½”
- 8 background - 2¾” x 2¾” ; mark a diagonal line on the wrong side.
- 1 orange - 2” x 2”
- 4 light yellow - 2¾” x 5”
- 4 dark yellow - 2¾” x 5”
- 4 dark yellow - 2” x 5”
- 8 dark yellow - 2¾” x 2¾” ; mark a diagonal line on the wrong side.
Directions:
- Flying Geese - On the wrong side of all the 2¾” squares mark a diagonal line. Place a square right sides together with a 2¾” x 5” rectangle; stitch on the marked line. Trim seam to ¼” and press. Repeat for the remaining corner. Make 4 of each color combination of flying geese units.

- Stitch together units of each color combination of flying geese.
- For the center of the block, stitch the flying geese units, the dark yellow rectangles, and the orange center together like a nine patch, first in rows, then stitch the rows together.
- To finish, add the narrow border to the top and bottom of the center; repeat for the narrow border at the sides.
|
Block 4 - 12” Blue Flax (12½” unfinished)
Cut:
- 4 background - 2½” x 2½”
- 4 background - 2½” x 4½”
- 8 background - 1½” x 1½”; mark a diagonal line on the wrong side.
- 1 yellow - 4½” x 4½”
- 1 light blue - 5¼” x 5¼”; cut in half diagonally twice to make 4 triangles
- 2 light blue - 4⅞” x 4⅞”; cut in half diagonally once to make 4 triangles
- 1 dark blue - 5¼” x 5¼”; cut in half diagonally twice to make 4 triangles
- 4 dark blue - 2½” x 2½”
- 4 dark blue - 1½” x 1½”; mark a diagonal line on the wrong side.
Directions:
- On the wrong side of all the 1½” squares mark a diagonal line.
- Stitch together a small size light blue and dark blue triangle, then stitch this to a large light blue triangle. Place a 1½” background square in the corner of this unit, right sides together; stitch on the marked line. Trim seam to ¼” and press. Repeat for the remaining corner. Make 4.

- For the center of the block, place a 1½” dark blue square in the corner of the yellow square, right sides together; stitch on the marked line. Trim seam to ¼” and press. Repeat for the remaining corners.
- Stitch together the dark blue and background 2½” squares; stitch this to the 2½” x 4½” background rectangle. Make 4.
- To finish, stitch the units into rows of 3, then stitch together the rows.
|
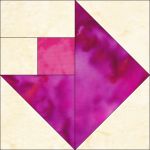
Block 5 - 12” Lily (12½” unfinished)
Cut:
- 4 background - 3½” x 3½”
- 4 background - 3½” x 3½”; mark a diagonal line on the wrong side.
- 2 background - 3⅞” x 3⅞”; cut in half diagonally to make 4 triangles.
- 4 light - 3½” x 3½”; mark a diagonal line on the wrong side.
- 4 medium - 3½” x 6½”
- 2 dark - 3⅞” x 3⅞”; cut in half diagonally to make 4 triangles.
Directions:
- Place a marked background 3½” square right sides together with a 3½” x 6½” rectangle; stitch on the marked line. Trim seam to ¼” and press. Repeat at the opposite end of the rectangle with a light marked square, making sure the direction of the seams are the same as in the diagram. Make 4 units like this.

- Stitch the background and dark triangles together to make 4 half square triangle units.
- Stitch the 3½” background squares to the half square triangle units. Then add this unit to the units from Step 1.
- To finish, stitch together like a 4-patch.

|
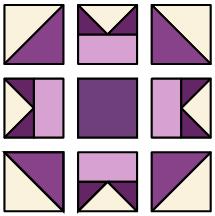
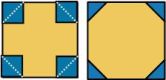
Block 6 - 12” Aster (12½” unfinished)
Cut:
- 4 background - 2½” x 4½”
- 12 background - 2½” x 2½”; mark a diagonal line on the wrong side of 8 squares.
- 2 light yellow - 2½” x 2½”
- 2 dark yellow - 2½” x 2½”
- 4 lavender - 2½” x 4½”
- 4 medium purple - 2½” x 4½”
- 4 dark purple - 2½” x 2½”
Directions:
- Place a marked background 2½” square right sides together with a medium purple 2½” x 4½” rectangle; stitch on the marked line, paying attention to the angle of the seam. Trim seam to ¼” and press. Make 2 units like this. Then make 2 more units with the angle of stitching the opposite of the first 2.
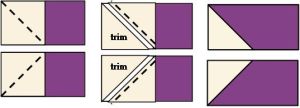
- Place a marked background 2½” square right sides together with a lavender 2½” x 4½” rectangle; stitch on the marked line, paying attention to the angle of the seam. Trim seam to ¼” and press. Make 2 units like this. Then make 2 more units with the angle of stitching the opposite of the first 2.
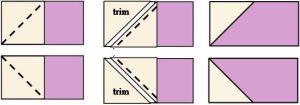
- Stitch together the units from Steps 1 and 2, making 2 of each combination as illustrated.

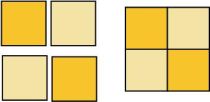
- Make a 4-patch for the center using the light and dark yellow squares.
- Stitch together the 2½” background and dark purple squares; stitch this to the 2½” x 4½” background rectangle to make 4 units.
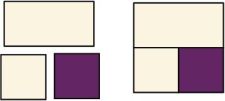
- To finish, stitch together like a 9-patch.
|
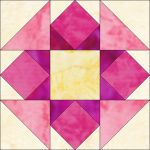
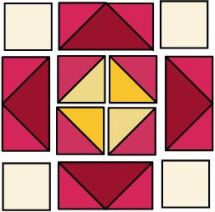
Block 7 - 12” Peony (12½” unfinished)
Cut:
- 2 background - 4⅞” x 4⅞”; cut diagonally to make 4 triangles
- 4 background - 2⅞” x 2⅞”; cut diagonally to make 8 triangles
- 1 yellow - 4½” x 4½”
- 2 light pink - 4⅞” x 4⅞”; cut diagonally to make 4 triangles
- 4 medium pink - 3⅜” x 3⅜”
- 4 dark pink - 2⅞” x 2⅞”; cut diagonally to make 8 triangles
Directions:
- Stitch a 2⅞” background and dark pink triangle to opposite sides of a medium pink square. Repeat for the remaining 2 sides. Make 4 of these units.
- Stitch the light pink and background triangles together.
- To finish, stitch together like a 9-patch: first into rows of 3, then stitch the rows together.
|
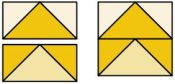
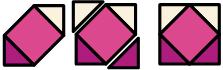
Block 8 - 12” Catchfly (12½” unfinished)
Cut:
- 4 background - 2⅜” x 2⅜”; cut in half diagonally to make 8 triangles
- 2 background - 6⅞” x 6⅞”; cut in half diagonally to make 4 triangles.
- 2 light orange - 4¼” x 4¼”; cut in half diagonally twice to make 8 triangles.
- 4 dark orange - 2” x 2”
- 1 dark orange - 4¾” x 4¾”
- 4 dark orange - 2⅝” x 2⅝”
Directions:
- Stitch one small background triangle to a 2” dark orange square; add another triangle as illustrated. Make 4 units.
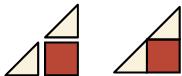
- Stitch a light orange triangle to one side of the triangle unit from Step 1; add another light orange triangle to the adjacent side as in the diagram. Make 4 units.

- Make 2 rows with a dark orange 2⅝” square at each end of a unit from Step 2. Make 1 row with the dark orange 4¾” square between 2 units from Step 2. Stitch together the 3 rows.
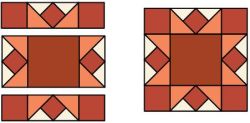
- To finish, stitch 2 background triangles to 2 opposite sides of the center square; add the last 2 triangles to the remaining sides.

|
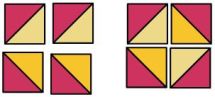
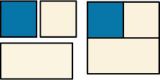
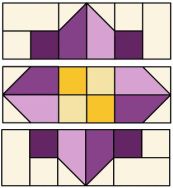
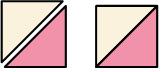
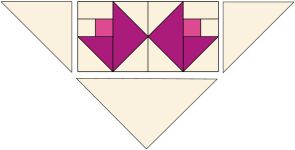
Block 9 - Rose Triangle
Make 6. For 6 Rose triangles, cut:
- 3 background - 4¼” x 4¼”; cut diagonally twice to make 12 triangles
- 6 background - 2⅜” x 2⅜”; cut diagonally once to make 12 triangles
- 6 background - 2” x 2”
- 6 background - 3½” x 10½”
- 6 background - 3½” x 13½”
- 6 light pink - 2” x 2”
- 6 medium pink - 2⅜” x 2⅜”; cut diagonally once to make 12 triangles
- 6 dark pink - 4¼” x 4¼”; cut diagonally twice to make 12 triangles
Directions for 1 Rose triangle:
- Stitch together the medium pink and background triangles. Stitch these 2 units together as a 4-patch with the light pink and background 2” squares.
- Stitch the dark pink and background triangles together. Stitch these 2 units to adjacent sides of the rose center from Step 1.
- Lining up the 3½” x 10½” background rectangle to the rose triangle as illustrated, stitch to the side of the rose.
- In similar fashion, add the 3½” x 13½” background rectangle to the side of the rose.
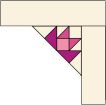
- To finish, trim both rectangles even with the rose triangle. Make a total of 6 rose triangles.

|
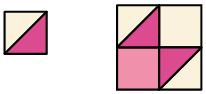
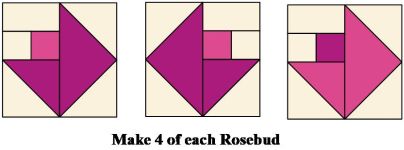
Block 10 - Rosebuds
Make 12.
Note: in these directions, the colors of the Rosebuds are different in the center from those in the border cornerstones. You can make them all the same or change things up, however you wish. The directions reflect the colors in these illustrations
- 12 background - 1¼” x 1¼”
- 12 background - 1¼” x 2”
- 18 background - 2⅜” x 2⅜”; cut diagonally once to make 36 triangles
- 8 medium pink - 1¼” x 1¼”
- 2 medium pink - 2⅜” x 2⅜”; cut diagonally once to make 4 triangles
- 1 medium pink - 4¼” x 4¼”; cut diagonally twice to make 4 triangles
- 4 dark pink - 1¼” x 1¼”
- 4 dark pink - 2⅜” x 2⅜”; cut diagonally once to make 8 triangles
- 2 dark pink - 4¼” x 4¼”; cut diagonally twice to make 8 triangles
For the 4 corners, cut
- 1 background - 7¼” x 7¼”; cut diagonally twice to make 4 triangles
- 4 background - 3⅞” x 3⅞”; cut diagonally once to make 8 triangles
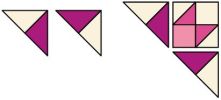
Directions for 1 Rosebud:
- Stitch together the 1¼” pink and background squares. Add the background 1¼” x 2” rectangle. Stitch a 2⅜” background triangle to the same size pink triangle; stitch to previous unit. Stitch a 2⅜” background triangle to the large pink triangle; press out, then add a background triangle to the opposite side. To complete, stitch this unit to the previous unit.

- Make 4 of each Rosebud. Use 8 for the corners of the quilt center, use 4 for the border cornerstones.
- OR if you would prefer to foundation paper piece the 12 rosebuds, print 3 copies of this: Rosebuds foundations. (Print on "Actual Size". Check to make sure each Rosebud pattern measures 3½" square at the outside line.)
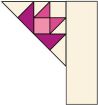
- To make the quilt center corners, stitch together 2 Rosebuds as illustrated. Stitch a 3⅞” background triangle on each end of the double Rosebuds. To complete, add the large background triangle. Make 4 quilt center corners.
|
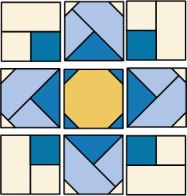
Finishing
Cut:
- Sashing - cut 24 - 2½” x 12½”
Cornerstones - cut 7 - 2½” x 2½”
Cornerstone triangles - cut 3 - 4” x 4”, cut in half diagonally twice to make 12 triangles (only use 10)
- Border 1 - cut 6 2” strips WOF. Piece into one long strip to cut borders (Measurements for all borders are approximate. Measure your quilt through the middle to cut your exact lengths.):
cut 2 - 2” x 59⅞”
cut 2 - 2” x 43⅛”
- Border 2 - cut 6 3½” strips WOF. Piece into one long strip to cut borders:
cut 2 - 3½” x 62⅞”
cut 2 - 3½” x 43⅛”
- Binding - cut 6 2½” strips WOF
Directions:
- Assemble the rows of sashing by stitching the green triangles, sashing strips, and cornerstones as illustrated. Assemble the rows of rose triangles, sashing strips, and blocks. Then stitch the diagonal rows together to complete the center of the quilt.
- Measure through the center of the quilt to get your exact length; stitch on the Border 1 sides. Again, measure through the center to get the exact width; stitch on Border 1 top and bottom.
- Repeat the measuring through the center of the quilt to determine the Border 2 measurements. Stitch on the side borders. Stitch the rosebud cornerstones to top and bottom borders, then stitch to quilt.
- Quilt as desired and bind.
|
Please note:- This project will be available all through 2019.
- These patterns are for personal use only
. Any other use requires express written permission by the designer. - All designs ©2019 Jeanne R. Prue, all rights reserved.
- The information on this site is presented in good faith, but no warranty is given nor results guaranteed.
|