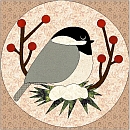
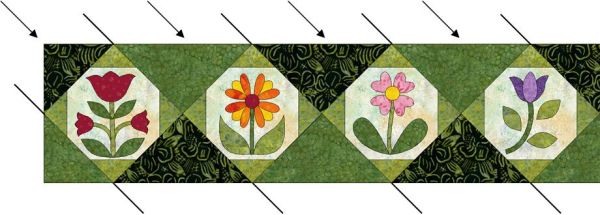
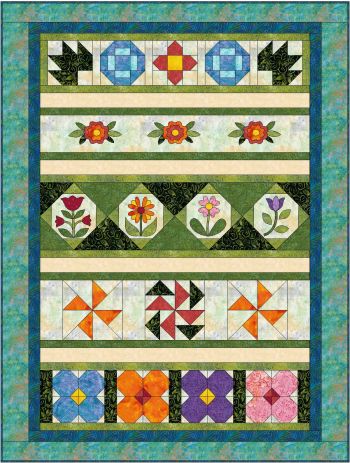
The Rosy Posy Rows is Jeanne Rae Crafts' Block of the Month Quilt for 2016. We've featured a Block of the Month project every year since 1998, making this project our 19th! Come back monthly for each succeeding step. The Rosy Posy Rows Quilt features both applique and pieced blocks. The appliqué in this quilt was designed with machine appliqué in mind but is still suitable for hand appliqué. The twelve steps to making the blocks will be introduced throughout the year with the finishing directions to end the year's lessons. This quilt lends itself to using up scraps or utilizing fat quarters. Whichever you choose, it will be a cheerful lap quilt or wall hanging!
For tips and more, check out my blog. |
Fabrics needed:
- Background - 1 yd.
- Light green - ½ yd.
- Medium green - ¾ yd.
- Dark green - ⅝ yd.
- Cream - ⅜ yd.
- Orange - ⅜ yd.
- Medium blue - ¼ yd.
- Red - ¼ yd.
- Light blue, yellow, purple, lavender, pink, dark red - fat eighths or scraps
- Border 1 - ¾ yd. WOF (width of fabric) OR 1½ yd. if using lengthwise strips
- Border 2 - ⅞ yd. WOF OR 1⅝ yd. if using lengthwise strips
- Binding - 1/2 yd.
- Backing/batting - 2⅝ yd.
|
Rosy Posy Rows Quilt
Blocks
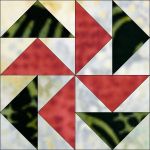
1. Phlox
2. Bachelor Button
3. Leaf

4. Rose Motif

5. Tulip CORRECTED

6. Dianthus
Rosy Posy Rows Quilt
Blocks

7. Zinnia

8. Poppy
9. Red Lily

10. Candy Lily

11. Primrose

12. Finishing
| |
Rosy Posy Rows Quilt Blocks
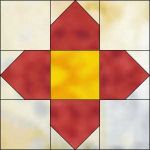
Phlox - Make 1
Cut:
- Background - cut 4 - 2½” x 2½”
- Background - cut 8 - 1½” x 1½”; draw a diagonal line on the wrong side.
- Red - cut 4 - 2½” x 2½”
- Yellow - cut 1 - 2½” x 2½”
Directions: Lay one background square right sides together with on red square; stitch on the marked line. Trim ¼” from seam; press seam toward the red. Repeat for adjacent corner. Stitch the block together as a 9-patch, first in rows of 3, then the 3 rows together. With seam allowances, this block measures 6½”x 6½” (6”x 6” finished).
|
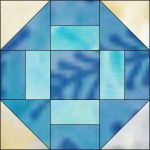
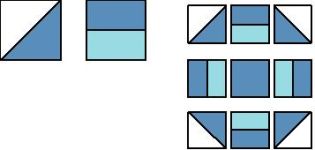
Bachelor Button - Make 2
For one block cut:
- Background - cut 2 - 2⅞” x 2⅞”; cut in half diagonally to make 4 triangles.
- Light blue - cut 4 - 1½” x 2½”
- Dark blue - cut 1 - 2½” x 2½”
- Dark blue - cut 2 - 2⅞” x 2⅞”; cut in half diagonally to make 4 triangles.
- Dark blue - cut 4 - 1½” x 2½”
Directions: Stitch the dark blue and background triangles together. Stitch the light blue and dark blue rectangles together. Stitch the block together as a 9-patch, first in rows of 3, then the 3 rows together. With seam allowances, this block measures 6½”x 6½” (6”x 6” finished).
|
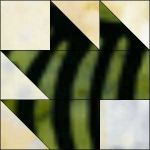
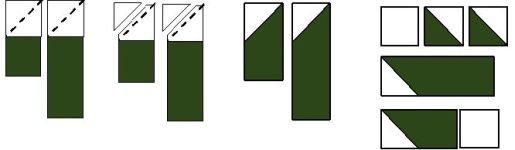
Leaf - Make 2
For one block cut:
- Background - cut 2 - 2½” x 2½”
- Background - cut 2 - 2½” x 2½”; draw a diagonal line on the wrong side of each.
- Background - cut 1 - 2⅞” x 2⅞”; cut in half diagonally to make 2 triangles.
- Dark green - cut 1 - 2⅞” x 2⅞”; cut in half diagonally to make 2 triangles.
- Dark green - cut 1 - 2½” x 4½”
- Dark green - cut 1 - 2½” x 6½”
Directions: Lay a marked background square right sides together with each dark green rectangle; stitch on the marked line. Trim ¼” from seam; press seam toward the green.
Stitch the background and dark green triangles together. Assemble the rows together as illustrated, then sew the 3 rows together. With seam allowances, this block measures 6½”x 6½” (6”x 6” finished).
|
Completing Row 1
Cut:
- Background - cut 4 - 1½” x 6½”
- Light green - cut 2 - 1½” x 6½”
Directions: Stitch the sashing between each block and at the ends of the row.

|
Completing Row 3
Cut:
- Medium green - cut 1 - 5-3/8” x 5-3/8”; cut in half diagonally to make 2 triangles.
- Medium green - cut 1 - 10-1/4” x 10-1/4”; cut in half diagonally twice to make 4 triangles (you will only use 3).
- Dark green - cut 1 - 5-3/8” x 5-3/8”; cut in half diagonally to make 2 triangles.
- Dark green - cut 1 - 10-1/4” x 10-1/4”; cut in half diagonally twice to make 4 triangles (you will only use 3).
Directions: Stitch a triangle to each side of each appliqued block as illustrated. Then stitch the sections together to complete the row.
|
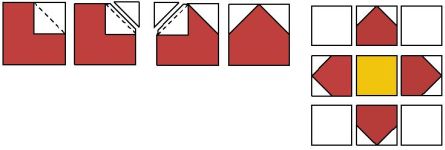
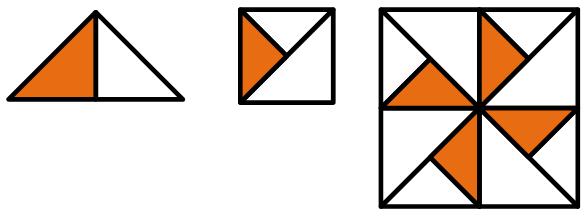
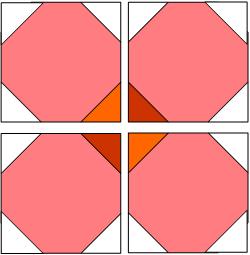
Red Lily - Make 1
For one block cut:
- Background - cut 8 - 2⅞” x 2⅞”, mark each in Step 1.
- Dark green - cut 1 - 5¼” x 5¼”
- Red - cut 1 - 5¼” x 5¼”
Directions:
- On the wrong side of the 2⅞” x 2⅞” background squares mark a diagonal line. Mark a line on each side of the diagonal line ¼” away.
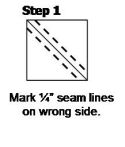
- Place 2 marked squares right sides together with the dark green 5¼” x 5¼” square. Stitch on the marked ¼” seam lines. Cut apart at the center diagonal line. Press small triangles out.
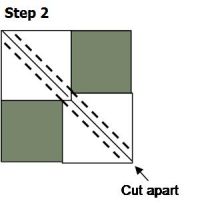
- Place a marked square right sides together, lining up the outer corner. Stitch on the marked ¼” seam lines. Cut apart at the center diagonal line. Press small triangle out. Repeat for remaining unit to make 4 dark green flying geese. Repeat with the remaining background squares and the red 5¼” x 5¼” square to make 4 red flying geese.
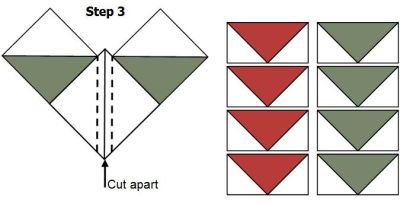
- Stitch a green flying geese unit to a red unit; repeat for the remaining units. To finish, stitch together as a 4-patch. Measures 8½” square unfinished.

|
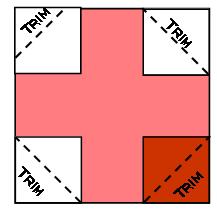
Candy Lily - Make 2
For the two blocks cut:
- Background - cut 4 - 4⅞” x 4⅞”, cut diagonally once to make 8 triangles.
- Background - cut 2 - 5¼” x 5¼”, cut diagonally twice to make 8 triangles.
- Orange - cut 2 - 5¼” x 5¼”, cut diagonally twice to make 8 triangles.
Directions:
- Stitch each orange triangle to each small background triangle.
- Stitch the units from Step 1 to the remaining large triangles.
- To finish, stitch together as two 4-patches. Measures 8½” square unfinished.
|
Completing Row 4
Cut: Background - cut 4 - 3½” x 8½”
Directions: To complete Row 4, stitch a background filler in between each block and at each end of the row.

|
Primrose - Make 4
For the four blocks cut:
- background - cut 48 - 2” x 2”, mark a diagonal line on the wrong side of each.
- pink - cut 4 - 4” x 4”
- purple - cut 4 - 4” x 4”
- orange - cut 4 - 4” x 4”
- blue - cut 4 - 4” x 4”
- light red - cut 4 - 2” x 2”, mark a diagonal line on the wrong side of each.
- dark red - cut 4 - 2” x 2”, mark a diagonal line on the wrong side of each.
- light yellow - cut 4 - 2” x 2”, mark a diagonal line on the wrong side of each.
- dark yellow - cut 4 - 2” x 2”, mark a diagonal line on the wrong side of each.
- dark green - cut 5 - 2⅛” x 7½”, fillers to complete Row 5.
Directions:
- Place a background 2" x 2" square on 3 corners and a light red 2" x 2" square right sides together with a pink 4" x 4" square. Stitch on the marked lines. Trim the corners, leaving a 1/4" seam allowance.
- Make two units with light red on one corner and two with dark red on one corner.
- Stitch together the four units as a four patch, as illustrated. Each Primrose block measures 7½" unfinished.
- Repeat for the purple/yellow, blue/yellow, and orange/red squares to make 4 Primrose blocks.
- To complete Row 5, stitch a dark green filler in between each block and at each end of the row.

|
Finishing
Cut:
- light green - cut 6 - 1½” x 36½”
- medium green - cut 4 - 1½” x 36½”
- cream - cut 4 - 2½” x 36½”
- border 1 - cut 2 - 2” x 53½” (approximate - measure quilt top*)
- border 1 - cut 2 - 2” x 39½” (approximate - measure quilt top*)
- border 2 - cut 2 - 4” x 56½” (approximate - measure quilt top*)
- border 2 - cut 2 - 3” x 46½” (approximate - measure quilt top*)
- binding - cut 6 - 2½” x WOF
Directions:
- Stitch light green/cream/medium green strips together to make 4 sets. Stitch these sets in between each of the completed row sets.

- Stitch a light green 1½” x 36½” to the top of Row 1 and the bottom of Row 5.

- *Measure the length and width through the middle of the quilt. For border 1, cut 2 strips the length measurement (approximately 2” x 53½”); stitch to quilt sides. Press seams toward the border. Cut 2 strips the width measurement (approximately 2” x 39½” ); stitch to quilt top and bottom. Press seams toward the border.
- *Measure the length and width through the middle of the quilt. For border 2, cut 2 strips the length measurement (approximately 4” x 56½” ); stitch to quilt sides. Press seams toward the border. Cut 2 strips the width measurement (approximately 3” x 46½” ); stitch to quilt top and bottom. Press seams toward the border.
- Layer backing, batting, and quilt top. Quilt as desired.
- Stitch binding strips together to make one long piece. Fold in half the entire length and press. Bind the quilt, mitering corners.
|
Please note:- This project will be available until January 30, 2017.
- These patterns are for personal use only
. Any other use requires express written permission by the designer. - All designs ©2016 Jeanne R. Prue, all rights reserved.
- The information on this site is presented in good faith, but no warranty is given nor results guaranteed.
|